MEAN Stack User Authentication and SMS validation with Twilio/Authy: Part 1/2 - Developing the API
In this mini two part series I am going to share some code and guidance on how to use Twilio/Authy for user SMS authentication using a MEAN stack enviorment to create a full authentication system for a mobile phone app (iOS/Android) or web app.
This blog post will explore the development of the backend server; including API, MongoDB database and authenticating users. A follow-up post will explore the creation of the IONIC app (can be adapted to web app) and will be live in a couple of days. The series will cover:
- Registration, validation and storing of user credentials.
- Authy authentication and SMS messaging
- Log in a user using token based authentication.
- Protect routes and app states based on the log in user status.
All the code will be available on my GitHub page here. This repo contains the Login App and backend server. Take note of the comments within the ReadMe file. I am using the MEAN stack, but you can use any type of enviorment as the principles remain largely the same. If you are new to the MEAN stack, or want some suggestions on software, I would recommend the following
- ATOM: This is a hackable text editor developed by the guys at GitHub.
- Robomongo: Which is a native and cross-platform MongoDB manager.
- Postman: This is a Google Chrome plugin which enables you to develop, build and test your APIs.
Before we get started, I want to acknowledge Simon@Devdactic and Jason@JasonWatmore who have already made some great tutorials on this topic and aspects are utilised in this post. Secondly, I want to make it clear that for the following tutorial, while explaining all the main concepts, should not be used in a production setting in its current form.
If you are interested in the authentication API and not the SMS two-step authentication you can disable this feature in the code. However, if you are looking to implement Twilio and Authy you can register and use the free trial accounts.
Structure of the backend
In this post we are going to use MongoDB as our data store, Express.js as as our backend server, Angular.js as our front-end within the Login app and Node.js as our backend application framework. The backend folder structure looks like this
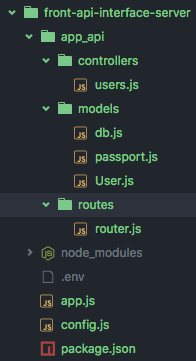
As you can see, I have clearly separated the models, routes and controller. I use a .env to store environmental variables (good practise) and a config.js file to call in these environmental variables.
NPM Install (package.json)
The package.json contains a manifest of dependancies required to operate the backend server. For the vast majority of projects you will have this file, in which you will specific the library and version range. For this project, our looks like this
  "dependencies": {
    "authy": "^0.3.2",
    "bcrypt": "^0.8.1",
    "body-parser": "^1.12.0",
    "express": "^4.12.0",
    "mongoose": "^4.0.6",
    "morgan": "^1.5.1",
    "twilio": "^1.11.1",
    "passport": "^0.3.0",
    "passport-jwt": "^1.2.1",
     "jwt-simple": "^0.3.1"
  }
We use authy for two-step authentication, bcrypt for password encryption, twilio for sending text messages and passport for user authentication. passport-jwt and jwt-simple for token generation and authentication. Morgan and mongoose are used for the data store of data credentials.
You can now go ahead and run:
npm install
Which installs the required dependancies and packages.
Defining Configuration (config.js)
The next step is to define the configuration parameters, these are used throughout the backend to define the database URL, API keys and SMS telephone numbers. The config.js should look like the following
var cfg = {};

// HTTP Port to run our web application
cfg.port = process.env.PORT || 8080;

// A random string that will help generate secure one-time passwords and HTTP sessions
cfg.secret = process.env.APP_SECRET;

// Your Twilio account SID and auth token, both found at: https://www.twilio.com/user/account
cfg.accountSid = process.env.TWILIO_ACCOUNT_SID;
cfg.authToken = process.env.TWILIO_AUTH_TOKEN;

// A Twilio number you control Specify, e.g. "+16519998877"
cfg.twilioNumber = process.env.TWILIO_NUMBER;

// Your Authy production key
cfg.authyKey = process.env.AUTHY_API_KEY;

// MongoDB connection string - MONGO_URL is for local dev,
// MONGOLAB_URI is for the MongoLab add-on for Heroku deployment
// MONGO_PORT_27017_TCP_ADDR is for connecting to the Mongo container
// when using docker-compose
cfg.mongoUrl = process.env.MONGOLAB_URI || process.env.MONGO_URL || process.env.MONGO_PORT_27017_TCP_ADDR;

// Enable SMS 2FA processes
cfg.enableValidationSMS = process.env.enableValidationSMS;

// Export configuration object
module.exports = cfg;
You will notice that I am calling process.env., a good practice is to store variable values as system environment variables, and load them from there as I am doing. You should avoid hard coding these values. Your .env to run in the terminal will be
export TWILIO_ACCOUNT_SID=XX
export TWILIO_AUTH_TOKEN=XX
export TWILIO_NUMBER=+44000000
export AUTHY_API_KEY=XXX
export MONGO_URL='mongodb://localhost/LoginExample'
export APP_SECRET='lalalalala'
export enableValidationSMS=1
Note that for TWILIO_ACCOUNT_SID, TWILIO_AUTH_TOKEN, TWILIO_NUMBER and AUTHY_API_KEY you will need to obtain these from Twilio and Authy.
Backend Server (app.js)
The next step is to generate the wrapper for the backend server, in app.js we insert the following
var express = require('express');
var app = express();
var bodyParser = require('body-parser');
var morgan = require('morgan');
var passport = require('passport');
var config = require('./config');

require('./app_api/models/db');
require('./app_api/models/passport')(passport);

// get and define request parameters
app.use(bodyParser.urlencoded({
    extended: false
}));
app.use(bodyParser.json());

// log to console (important for feedback)
app.use(morgan('dev'));

// Use the passport package in our application
app.use(passport.initialize());

//This ensures we can execute the app during simulation
//Drop if going to production
app.use(function(req, res, next) {
    res.header("Access-Control-Allow-Origin", "*");
    res.header("Access-Control-Allow-Headers", "Origin, X-Requested-With, Content-Type, Accept, Authorization");
    res.header('Access-Control-Allow-Methods', 'POST, GET, PUT, DELETE, OPTIONS');
    if (req.method === 'OPTIONS') {
        res.end();
    } else {
        next();
    }
});

app.get('/', function(req, res) {
    res.send('Hello! The API ladning is at http://localhost:' + config.port + '/app_api');
});

// Start the server and listen out to requests
app.listen(config.port);
console.log('Server watching: http://localhost:' + config.port);

// Define the routes
app.use('/app_api', require('./app_api/routes/router'));
The app.js is the entry point into the node.js backend, it defines the settings, binds controllers to routes and starts the http server to listen on the specified port.
The Database - MongoDB (db.js)
Mongoose is the MongoDB driver used to access to the database and perform CRUD operations. The db.js also contains handlers in trigger in the event of the app crashing, connection failure and server shut down. The db.js should look like
var mongoose = require('mongoose');
var config = require('../../config');
var gracefulShutdown;

//Define the connection to the database.
var dbURI = config.mongoUrl;
if (config.mongoUrl=== 'production') {
    dbURI = config.mongoUrl;
}

//This overrides the error messages you get if you do not state promise
mongoose.Promise = global.Promise;
mongoose.connect(dbURI);

// Types of connection events
mongoose.connection.on('connected', function() {
    console.log('Mongoose connected to ' + dbURI);
});
mongoose.connection.on('error', function(err) {
    console.log('Mongoose connection error: ' + err);
});
mongoose.connection.on('disconnected', function() {
    console.log('Mongoose disconnected');
});

// App termination and app restart
// To be called when process is restarted or terminated
// These are unique for the server.
gracefulShutdown = function(msg, callback) {
    mongoose.connection.close(function() {
        console.log('Mongoose disconnected through ' + msg);
        callback();
    });
};
// For nodemon restarts
process.once('SIGUSR2', function() {
    gracefulShutdown('nodemon restart', function() {
        process.kill(process.pid, 'SIGUSR2');
    });
});
// For app termination
process.on('SIGINT', function() {
    gracefulShutdown('app termination', function() {
        process.exit(0);
    });
});

//Require database user scheme
require('./User');
Note that at the end we have require('./User');, this is important, we are calling in the modal for User which defined the MongoDB schema.
User Schema (User.js)
The user schema defines the MongoDB structure, parameter requirements, middleware for handling pre saving of data and schema methods.
var mongoose = require('mongoose');
var bcrypt = require('bcrypt');
var config = require('../../config');

// Create authenticated Authy and Twilio API clients
var authy = require('authy')(config.authyKey);
var twilioClient = require('twilio')(config.accountSid, config.authToken);

// Used to generate password hash
var SALT_WORK_FACTOR = 10;

// Define user model schema
var UserSchema = new mongoose.Schema({
    username: {
        type: String,
        unique: true,
        required: true
    },
    smsmobile: {
        type: String,
        required: true
    },
    verified: {
        type: Boolean,
        default: false
    },
    countryCode: Number,
    authyId: String,
    password: {
        type: String,
        required: true
    },
    lastLogin: {
        type: Date
    }
}, {
    timestamps: true
});

// Middleware executed before save - hash the user's password
UserSchema.pre('save', function(next) {
    var self = this;

    // only hash the password if it has been modified (or is new)
    if (!self.isModified('password')) return next();

    // generate a salt
    bcrypt.genSalt(SALT_WORK_FACTOR, function(err, salt) {
        if (err) return next(err);

        // hash the password using our new salt
        bcrypt.hash(self.password, salt, function(err, hash) {
            if (err) return next(err);

            // override password
            self.password = hash;
            next();
        });
    });
});

// Test and compare passwords
UserSchema.methods.comparePassword = function(candidatePassword, cb) {
    var self = this;
    bcrypt.compare(candidatePassword, self.password, function(err, isMatch) {
        if (err) return cb(err);
        cb(null, isMatch);
    });
};

// Send a verification token to the user (two step auth for login)
UserSchema.methods.sendAuthyToken = function(cb) {
    var self = this;

    if (!self.authyId) {
        // Register this user if it's a new user
        authy.register_user(self.email, self.smsmobile, self.countryCode,
            function(err, response) {

                if (err || !response.user) return cb.call(self, err);
                self.authyId = response.user.id;
                self.save(function(err, doc) {
                    if (err || !doc) return cb.call(self, err);
                    self = doc;
                    sendToken();
                });
            });
    } else {
        // Otherwise send token to a known user
        sendToken();
    }

    // With a valid Authy ID, send the 2FA token for this user
    function sendToken() {
        authy.request_sms(self.authyId, true, function(err, response) {
            cb.call(self, err);
        });
    }
};

// Test a 2FA token
UserSchema.methods.verifyAuthyToken = function(otp, cb) {
    var self = this;
    authy.verify(self.authyId, otp, function(err, response) {
        cb.call(self, err, response);
    });
};

// Send a text message via twilio to this user
UserSchema.methods.sendMessage = function(message, cb) {
    var self = this;
    twilioClient.sendMessage({
        to: self.countryCode + self.smsmobile,
        from: config.twilioNumber,
        body: message
    }, function(err, response) {
        cb.call(self, err);
    });
};

// Export user model
module.exports = mongoose.model('User', UserSchema);
You will notice the syntax "UserSchema.methods", this is a great little feature which enables us to attach functions to CRUD operations such as pre-save, post-save and password comparison functions.
API URL Router (router.js)
How do you handle the API calls? How do you know where to direct the incoming resource requests? These are handled via the router.js file.
var express = require('express');
var router = express.Router();
var passport = require('passport');

//Model for the user schema
var users = require('../controllers/users');

//Authenticate user login request
router.post('/authenticate', users.authUser);

//Register user
router.post('/user', users.userCreate);

//Verify SMS code
router.post('/user/:id/verify', users.verify);

//Get user account details (secured)
router.get('/users', passport.authenticate('jwt', { session: false}), users.getUser);


//We export the router and make it usable by the front-end app.
module.exports = router;
In this file we require the users controller, define the router.post and router.get methods and finally define the function to trigger upon routing.
Note that we require passport to protect the "router.get('/user'," route.
Passport (passport.js)
Passport is a node module we installed earlier, it handles user authentication and makes it easier to handle sessions.
var JwtStrategy = require('passport-jwt').Strategy;
var config = require('../../config');

// load up the user model
var User = require('./User');

module.exports = function(passport) {
  var opts = {};
  opts.secretOrKey = config.secret;
  passport.use(new JwtStrategy(opts, function(jwt_payload, done) {
    User.findOne({id: jwt_payload.id}, function(err, user) {
          if (err) {
              return done(err, false);
          }
          if (user) {
              done(null, user);
          } else {
              done(null, false);
          }
      });
  }));
};
What is great about this little script, it checks to ensure that the user has provided the correct JWT token, and that it is valid and the user exists. This is achieved before the request even hits our API controller.
Users Controller (users.js)
The final aspect of the backend is the user controller, which handles the creation of the user, sms notification, authentication and obtaining user accounts. The code should look like the following
var User = require('../models/User');
var jwt = require('jwt-simple');
var config = require('../../config');

// route to authenticate a user (POST http://localhost:8080/app_api/authenticate)
//authorise the user to be able to use the app
module.exports.authUser = function(request, response) {

    //Search to identify user
    User.findOne({
        username: request.body.username
    }, function(err, user) {

        //If we have an error, or the username is not present provide feedback.
        if (err) throw err;
        if (!user) {
            response.send({
                success: false,
                msg: 'Authentication failed.'
            });

        } else {

            //User does exist. It is now time to compare the password with that
            //which has been stored.
            user.comparePassword(request.body.password, function(err, isMatch) {
                if (isMatch && !err) {

                    //Generate the user token
                    var token_data = {
                        id: user._id,
                        dateLogOn: new Date()
                    };
                    //In the above example, I have also decided to encode the
                    //logon date.

                    //Encode the information
                    var token = jwt.encode(token_data, config.secret);

                    // return the information including token as JSON
                    response.json({
                        success: true,
                        token: 'JWT ' + token,
                        msg: ""
                    });

                } else {

                    //Throw password error if they do not match
                    response.send({
                        success: false,
                        msg: 'Authentication failed.'
                    });
                }
            });
        }
    });
};

// create a new user account (POST http://localhost:8080/app_api/user/)
module.exports.userCreate = function(request, response) {

    //Collect the body information
    var reqBody = request.body;

    if (!reqBody.username) {
        response.json({
            success: false,
            msg: 'Please pass username'
        });
    } else if (!reqBody.smsmobile) {
        response.json({
            success: false,
            msg: 'Please pass mobile number.'
        });
    } else if (!reqBody.password) {
        response.json({
            success: false,
            msg: 'Please pass password.'
        });
    } else {

        // Create a new user based on form parameters
        var user = new User({
            username: reqBody.username,
            smsmobile: reqBody.smsmobile,
            password: reqBody.password,
            countryCode: +44
        });

        user.save(function(err, doc) {
            if (err) {
                if (err.code == 11000) {
                    return response.json({
                        success: false,
                        msg: "Username already exists"
                    });
                } else {
                    //Throw error message if not known
                    response.send({
                        success: false,
                        msg: err
                    });
                }
            } else {
                //We may not to want to always send SMS messages.
                if (config.enableValidationSMS == 1) {
                    // If the user is created successfully, send them an account
                    // verification token
                    user.sendAuthyToken(function(err) {
                        if (err) {
                            response.send({
                                success: false,
                                msg: err
                            });
                        } else {
                            // Send for verification page
                            response.send({
                                success: true,
                                msg: {
                                    msg: doc._id
                                }
                            });
                        }
                    });
                } else {

                    //If we do not want to enable sms verification lets register and send confirmation
                    response.send({
                        success: true,
                        msg: {
                            msg: "Account created (SMS validation false)"
                        }
                    });
                }
            }
        });
    }
};

// Require sms verification (POST http://localhost:8080/app_api/user/:id/verify)
// Handle submission of verification token
module.exports.verify = function(request, response) {
    var user;

    // Load user model
    User.findById(request.params.id, function(err, doc) {
        if (err || !doc) {
            return response.send({
                success: false,
                msg: "User not found for this ID"
            });
        }

        // If we find the user, let's validate the token they entered
        user = doc;
        user.verifyAuthyToken(request.body.code, postVerify);
    });

    // Handle verification response
    function postVerify(err) {
        if (err) {
            return response.send({
                success: false,
                msg: "The token you entered was invalid - please retry."
            });
        }

        // If the token was valid, flip the bit to validate the user account
        user.verified = true;
        user.save(postSave);
    }

    // after we save the user, handle sending a confirmation
    function postSave(err) {
        if (err) {
            return response.send({
                success: true,
                msg: "There was a problem validating your account."
            });
        }

        // Send confirmation text message
        var message = 'You did it! Your signup is complete and you can now use the App :)';
        user.sendMessage(message, function(err) {
            if (err) {
                return response.send({
                    success: true,
                    msg: "You are signed up, but we could not send you a text message. Our bad - try to login."
                });
            }
            // show success page
            response.send({
                success: true,
                msg: message
            });
        });
    }

    // respond with an error not current used
    function die(message) {
        response.send({
            success: false,
            msg: message
        });
    }

};

// Provide user details (GET http://localhost:8080/app_api/user/)
module.exports.getUser = function(request, response) {

    //Obtain the header token for authentication
    var token = getToken(request.headers);

    if (token) {
        //Seek to decode the token
        var decoded = jwt.decode(token, config.secret);
        console.log(decoded)

        //By decoding the secret key we should be able to find the user
        User.findById(
            decoded.id,
            function(err, user) {
                if (err) throw err;
                if (!user) {

                    //Take note of the status header
                    //Return response
                    return response.status(403).send({
                        success: false,
                        msg: 'Authentication failed.'
                    });
                } else {

                    //Build user payload and return to user
                    response.json({
                        success: true,
                        msg: {
                            username: user.username,
                            smsmobile: user.smsmobile,
                            createdAt: user.createdAt,
                        }
                    });

                }
            });
    } else {

        //Return user response
        return response.status(403).send({
            success: false,
            msg: 'No token provided.'
        });
    }
};

//Obtain the user token ready for authorisation.
//This splits the header to ensure we are able to obtain the unique parts
getToken = function(headers) {
    if (headers && headers.authorization) {
        var parted = headers.authorization.split(' ');
        if (parted.length === 2) {
            return parted[1];
        } else {
            return null;
        }
    } else {
        return null;
    }
};
I will briefly explain some key aspects
- module.exports.authUser: Verify the user login credentials. If they match a user in our database a token is generated for a session and they are able to access the rest of our app.
- module.exports.userCreate: Provides the ability of generating a new user, sending the two-step authentication.
- module.exports.verify: This is an important function, this handles the verification of the SMS code. If it is incorrect, the code is rejected.
- module.exports.getUser: This enables an authorised user to obtain their account details. You will note that I am checking the JWT token within the script, this is to provide another example of how to do it within the controller. We already perform JWT authorisation in router.js.
Pulling it all Together and Testing
It is now time to pull it all together. If you have nodeman installed, you can run that, alternately you can execute the following command in the terminal directory
node app.js
You should have an output like the below in your terminal

Then you need to start Postman in your Google Chrome browser, we are going to be running the following commands:
- POST http://localhost:8080/app_api/user/
- POST http://localhost:8080/app_api/user/:id/verify
- POST http://localhost:8080/app_api/authenticate/
- GET http://localhost:8080/app_api/user/
Note: the URL may be different if you have changed the port or have a different setup. Also, make sure you have the MongoDB demon service running.
I will discuss running each API call in the following sections. Take note of all the options I have set in Postman.
Creating an account
To create an account you need to provide a username, password and mobile telephone number. Below is an example of the input, and the output
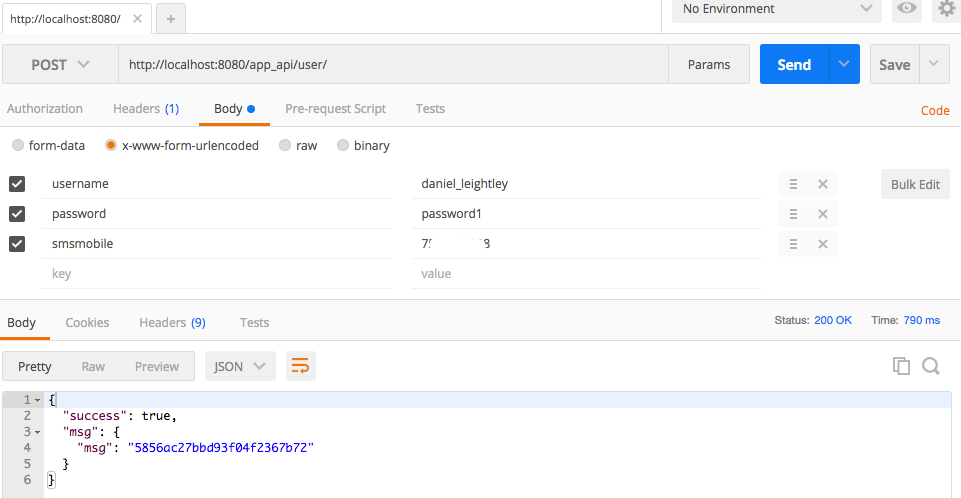
The server returns a msg which is the object ID of the user. We return this to enable us to validate the SMS text message in the next section.
SMS Validation
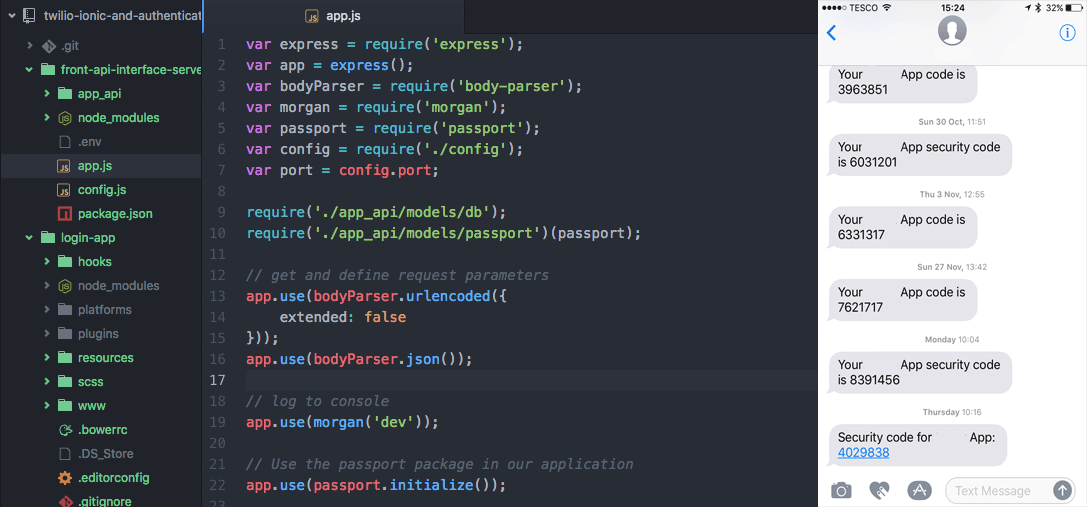
After registering a text message is sent via Authy, it looks like this
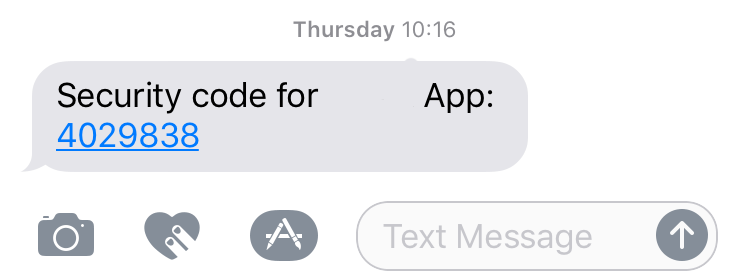
The message is sent to the mobile number provided during the registration process. We use the code to validate the the number, we can do this via Postman
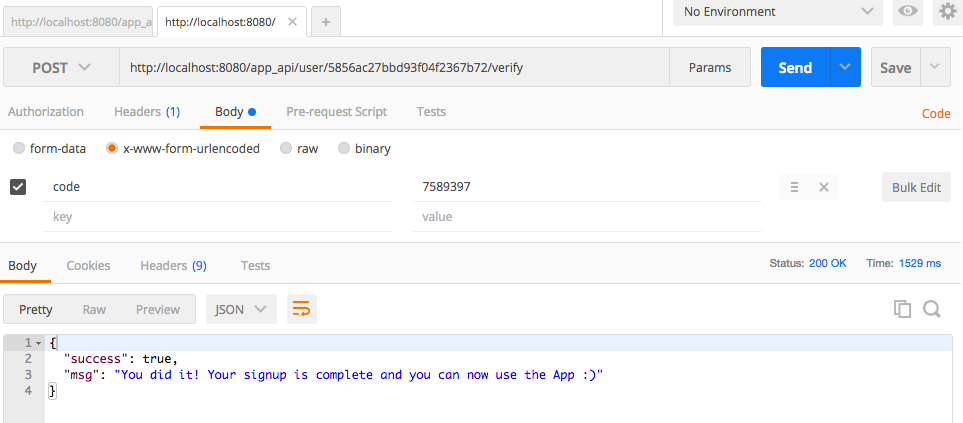
Pay close attention to the URL, we are using POST and embedding the object ID which was sent in the previous step. Within the body, we have defined the parameter "code" which contains the Authy code.
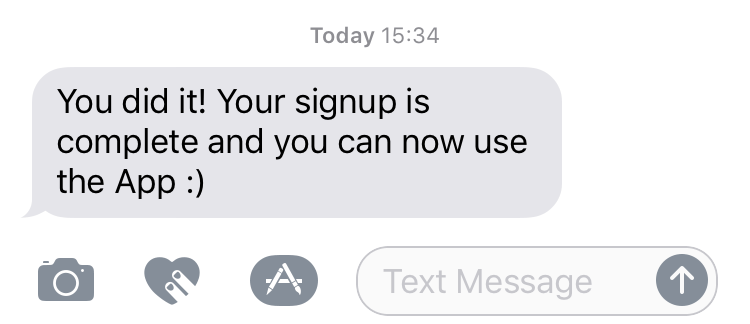
Upon submission we receive the server response confirming the message. If all has gone well, you have now registered and validated your account. We now use Twilio to send a message to the user
Authentication
Now that the user has registered and validated their number it is time to focus on login and authentication. It is actually a very straightforward task. See the Postman below
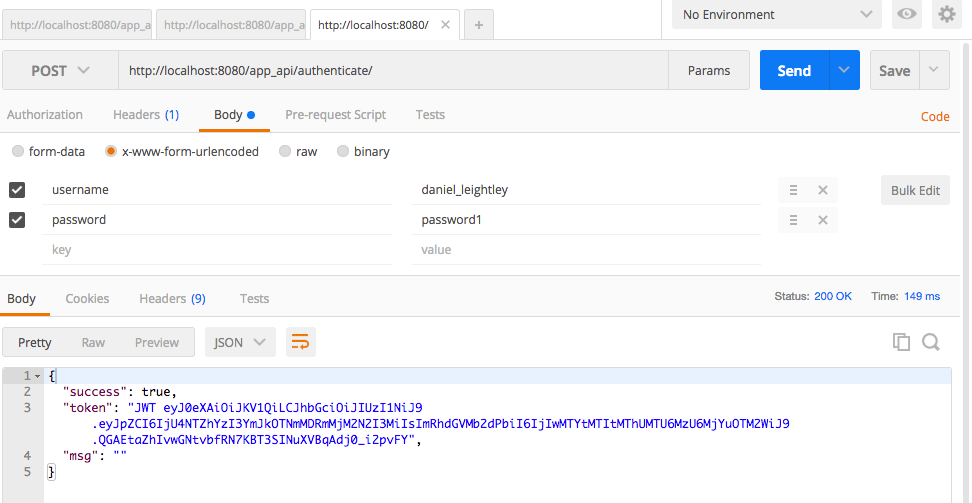
We provide the "username" and "password" as form values and POST to the API. In return, the API provides us with an encoded token which we need to use on all future secure requests.
Get Account Details
With the token provided upon authentication we need to assign it to the headers as shown in the Postman example below
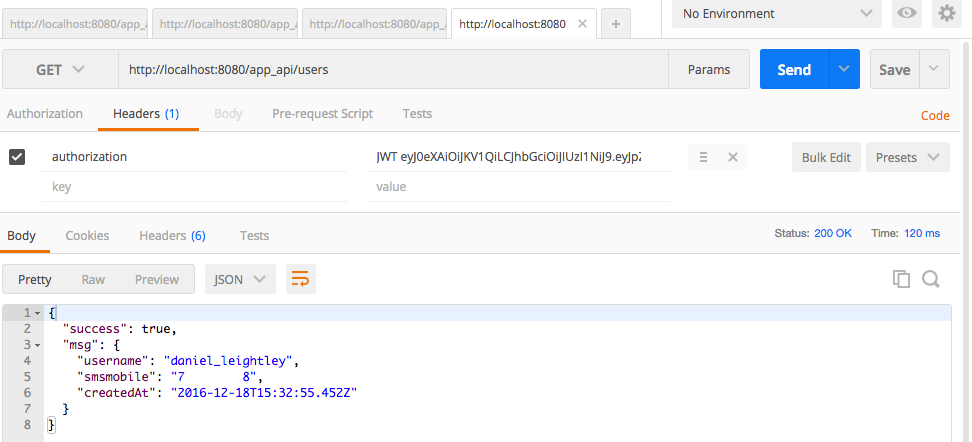
We are then able to use a GET request to obtain the details of interest.
Be sure to take a look at the MongoDB database using Robomongo to get a feel for the structure of the data.
Next Steps
In this post we have covered the development of the backend API, registration, sending Authy and Twilio messages. The next step is to extend these features to operate with an IONIC mobile phone app or a web app.
Resources
If this is still all a little new to you, you may find these resources useful when developing with MEAN:
- Book: Getting MEAN with Mongo, Express, Angular, and Node by Simon Holmes
- Book: Write Modern Web Apps with the Mean Stack: Mongo, Express, AngularJS, and Node.js (Develop and Design) by Jeff Dickey
- Create a MEAN Page Single Page Application
If you have any questions, comments or need any aspects of the code explaining further please leave a comment below
