MEAN Stack User Authentication and SMS validation with Twilio/Authy: Part 2/2 - Creating the IONIC App
This is the final post of the two part series for creating a MEAN stack user authentication framework with SMS verification. You can read about setting up the back-end server here.
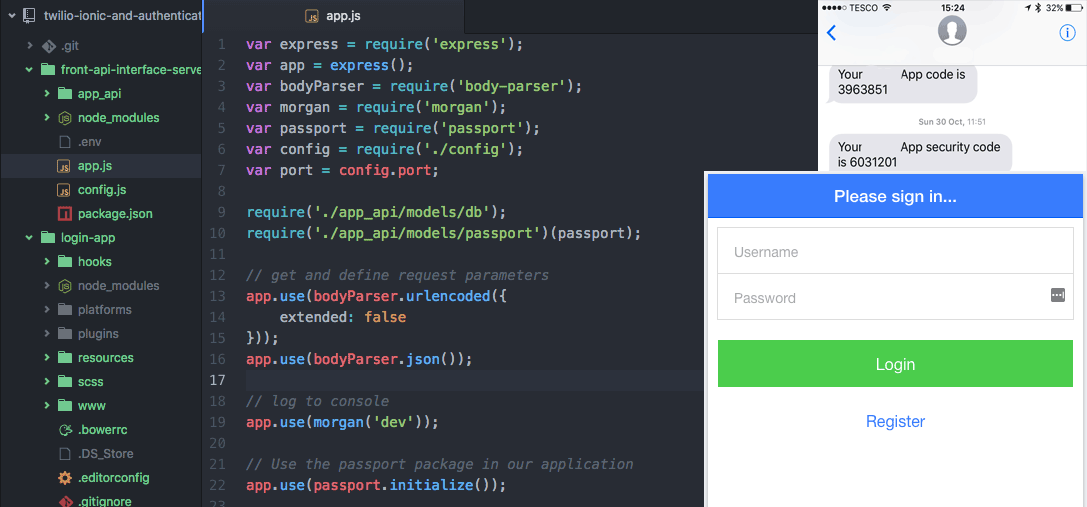
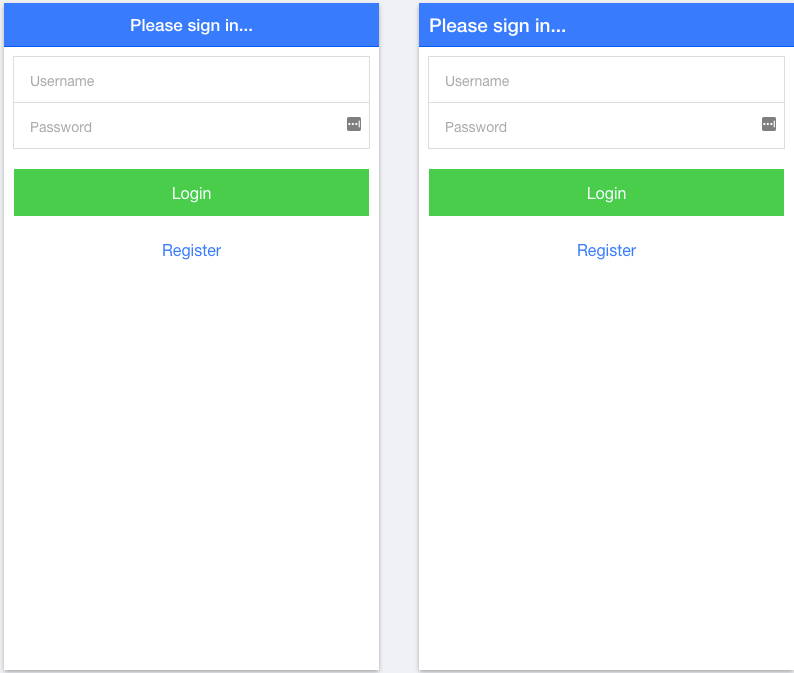
This blog post will explore the development of the IONIC app for both Android and iOS; including the ability to call our API to validate an SMS number using Authy. Below is an example of the Login App we are going to create.
All the code will be available on my GitHub page here. This repo contains the Login App and back-end server. Take note of the comments within the ReadMe file. I am using the MEAN stack, but you can use any type of environment as the principles remain largely the same.
Before we get started, I want to acknowledge Simon@Devdactic who has blogged about creating IONIC apps in great detail. His post on How To Handle User Authentication With AngularJS Inside Your Ionic App forms the basis of my app demonstration. Secondly, I want to make it clear that for the following tutorial, while explaining all the main concepts, should not be used in a production setting in its current form.
Prerequisites
I am going to assume that you have IONIC framework already installed on your machine. If not, I would recommend you take a look at this guide on how to install it along with its dependencies. A great resource for developing your IONIC apps is the IONIC documentation, which you can find here. IONIC is a great cross-platform framework for developing hybrid apps for the web, Android and iOS.
Creating the project and environment
We first need to create a blank project, if you have installed IONIC, navigate to the location where you would like to save the project. Note: you will need an active internet connection as it will attempt to download several files. You then need to run the following command in the terminal
ionic start login-app blank
After running the command, you will end up with the following file structure
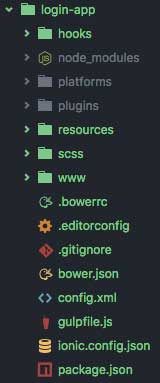
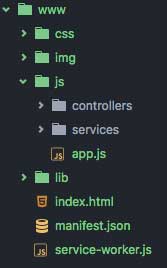
The folder where we are going to do all of our work in is www. The folder will contain all our javascript, HTML and libraries. To ensure we have a tidy work space, open www and create a controllers and services folder in the js folder. You should have the following folder structure after creating these files
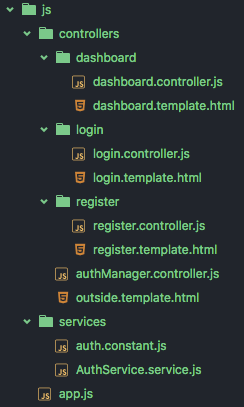
We will then need to create the files listed in the image below, you can create these now or as required. You will notice that I have appended .template.html or .controller.js to file names, this is a good habit to get into.
It is now time to start coding our app!
index.html (root)
The index.html creates the environment for the app and enables the correct routing (e.g. finding) of resources. Your file should look similar to the below
<!DOCTYPE html>
<html>
  <head>
    <meta charset="utf-8">
    <meta name="viewport" content="initial-scale=1, maximum-scale=1, user-scalable=no, width=device-width">
    <title></title>

    <link rel="manifest" href="manifest.json">

    <link href="lib/ionic/css/ionic.css" rel="stylesheet">
    <link href="css/style.css" rel="stylesheet">

    <!-- ionic/angularjs js -->
    <script src="lib/ionic/js/ionic.bundle.js"></script>

    <!-- cordova script (this will be a 404 during development) -->
    <script src="cordova.js"></script>

    <!-- your app's js -->
    <script src="js/app.js"></script>

    <!-- Your Controllers -->
    <script src="js/controllers/dashboard/dashboard.controller.js"></script>
    <script src="js/controllers/login/login.controller.js"></script>
    <script src="js/controllers/register/register.controller.js"></script>
    <script src="js/controllers/authManager.controller.js"></script>

    <!-- Your Services -->
    <script src="js/services/AuthService.service.js"></script>
    <script src="js/services/auth.constant.js"></script>

  </head>
  <body>
    <ui-view></ui-view>
        <script>
            angular.element(document).ready(function() {
                if (window.cordova) {
                    console.log("Running in Cordova, will bootstrap AngularJS once 'deviceready' event fires.");
                    document.addEventListener('deviceready', function() {
                        console.log("Index.html: Deviceready event has fired, bootstrapping AngularJS.");
                        angular.bootstrap(document.body, ['starter']);
                    }, false);
                } else {
                    console.log("Index.html: Running in browser, bootstrapping AngularJS now.");
                    angular.bootstrap(document.body, ['starter']);
                }
            });
        </script>
  </body>
</html>
Between the tags you will notice I am using bootstrap to detect if we are running the app in the browser or on a device. It is important to utilise this code for development purposes.
Login (login.controller.js & login.template.html)
If you review the example folder structure above, these are both located in js/conollers/login. The login.controller.js) should contain the following
angular.module('starter')

.controller('LoginCtrl', function($scope, AuthService, $ionicPopup, $state) {
  $scope.user = {
    username: '',
    password: ''
  };

  //If the user is able to login with valid details, send them to the dashboard
  $scope.login = function() {
    AuthService.login($scope.user).then(function(msg) {
      $state.go('dashboard');
    }, function(errMsg) {
      var alertPopup = $ionicPopup.alert({
        title: 'Login failed!',
        template: errMsg
      });
    });
  };
})
This simply takes the user input and pushes it to the API for authentication. The login.template.html will contain the following
<ion-view title="Please sign in...">
    <ion-content class="padding">

        <div class="list">

            <label class="item item-input">
                <span><i class="fa fa-user" aria-hidden="true"></i></span>
                <input type="text" placeholder="Username" ng-model="user.username">
            </label>

            <label class="item item-input">
                <span><i class="fa fa-lock" aria-hidden="true"></i></span>
                <input type="password" placeholder="Password" ng-model="user.password">
            </label>

        </div>

        <button class="button button-full button-balanced" ng-click="login()">
            Login
        </button>

        <button class="button button-positive button-clear button-full" ui-sref="outside.register">Register</button>

    </ion-content>
</ion-view>
Pay close attention to where I use ng-model, this allows us to grab the values in the input boxes and pass to our API. The login page will then look like the image below (when we are done).

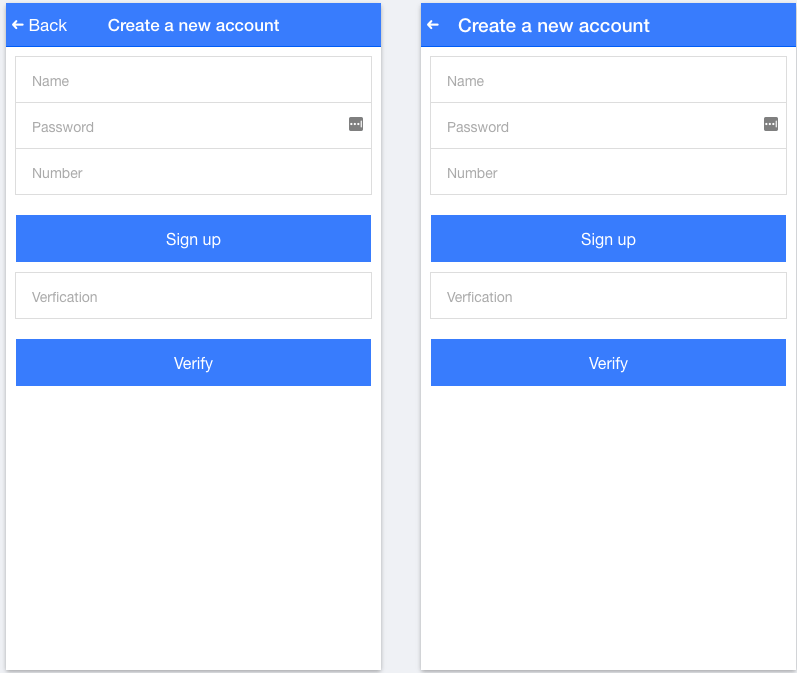
Registration (register.controller.js & register.template.html)
The registration controller and template are two important parts of the app. Here, we allow the user to provide a username, password and mobile number that we use to 1) register their account 2) send a verification SMS. Following the sample folder approach as before, ensure you place these in their own folder called register. The register.controller.js should contain the following
angular.module('starter')

.controller('RegisterCtrl', function($scope, AuthService, $ionicPopup, $state) {

  //Define the scope in memory ready for input
  $scope.user = {
    username: '',
    password: '',
    smsmobile: '',
    sms_id: '',
    code: ''
  };

  //Push the details to the server
  $scope.signup = function() {
    AuthService.register($scope.user).then(function(msg) {
      var alertPopup = $ionicPopup.alert({
        title: 'Register success!',
        template: msg.msg
      });
        $scope.user.sms_id = msg.msg;
    }, function(errMsg) {
      var alertPopup = $ionicPopup.alert({
        title: 'Register failed!',
        template: errMsg
      });
    });
  };

  //Take the user provided code and push back to our server
  $scope.verify = function() {
    AuthService.verify($scope.user).then(function(msg) {
      //If successful take them back to the login
      $state.go('outside.login');
      var alertPopup = $ionicPopup.alert({
        title: 'SMS Valid!',
        template: msg
      });
    }, function(errMsg) {
      var alertPopup = $ionicPopup.alert({
        title: 'Verfication failed!',
        template: errMsg
      });
    });
  };

})
Here, we firstly register the account using $scope.signup. Recall that the back-end will then send an SMS text message to the user. Then, we use $scope.verify to provide the code to the server.
The next step is to provide a template for the registration page. In the register.template.html place the following
<ion-view title="Create a new account">
  <ion-content class="padding">
    <div class="list">
      <label class="item item-input">
        <input type="text" placeholder="Name" ng-model="user.username">
      </label>
      <label class="item item-input">
        <input type="password" placeholder="Password" ng-model="user.password">
      </label>
      <label class="item item-input">
        <input type="tel" placeholder="Number" ng-model="user.smsmobile">
      </label>
    </div>
    <button class="button button-full button-positive" ng-click="signup()">
      Sign up
    </button>
    <div class="list">
      <label class="item item-input">
        <input type="text" placeholder="Verfication" ng-model="user.code">
      </label>
    </div>
    <button class="button button-full button-positive" ng-click="verify()">
      Verify
    </button>
  </ion-content>
</ion-view>
Your registration should look like the below (when we are done).
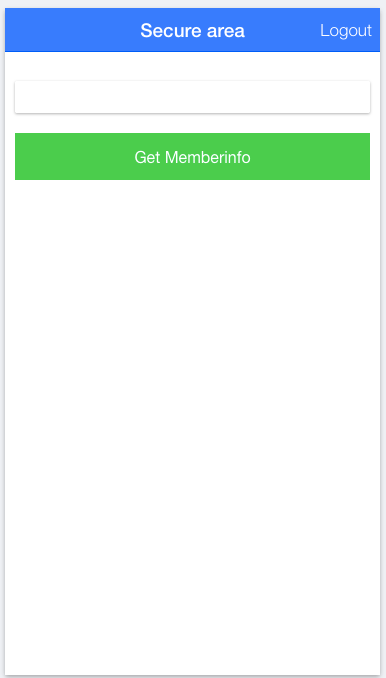
Dashboard (dashboard.controller.js & dashboard.template.js)
We have now created the login and registration pages, it is now time to create the internal page; where only authorised users are allow to have access. In your dashboard.controller.js place the following
angular.module('starter')

.controller('dashboardCtrl', function($scope, AuthService, API_ENDPOINT, $http, $state) {

  //Call the API and gab the users details
  $scope.getInfo = function() {
    $http.get(API_ENDPOINT.url + '/users').then(function(result) {
      $scope.memberinfo = result.data.msg;
    });
  };

  //Logout and end the session
  $scope.logout = function() {
    AuthService.logout();
    $state.go('outside.login');
  };
})
Here, we are allowing the user to call the back-end server and obtain their credentials or to logout. Then in your dashboard.template.html add the following syntax
<ion-view>
  <ion-header-bar align-title="center" class="bar-positive">
    <h1 class="title">Secure area</h1>
    <div class="buttons">
      <button class="button button-clear" ng-click="logout()">Logout</button>
    </div>
  </ion-header-bar>
  <ion-content class="padding">
    <div class="card">
      <div class="item item-text-wrap">
        {{memberinfo}}
      </div>
    </div>
    <button class="button button-full button-balanced" ng-click="getInfo()">
      Get Memberinfo
    </button>
  </ion-content>
</ion-view>
This means you have something that looks like the below (when we are done).
Outside (outside.template.html)
We need to define a template for which users are redirected if they are not authorised. In outside.template.html place the following
<ion-nav-bar class="bar-positive nav-title-slide-ios7">
      <ion-nav-back-button class="button-clear">
        <i class="ion-arrow-left-c"></i>
      </ion-nav-back-button>
</ion-nav-bar>

<ion-nav-view animation="slide-left-right">
  <!-- Center content -->
</ion-nav-view>
This is the last template we need to define. The next step is to create the logic behind the app; which makes it all work.
Authorisation Manager(authManager.controller.js)
This controller handles the event of the user not being authorised to view the content. It is very straightforward. The syntax is below
angular.module('starter')
//This ensures that the user is authorised to view the content
.controller('AppCtrl', function($scope, $state, $ionicPopup, AuthService, AUTH_EVENTS) {
  $scope.$on(AUTH_EVENTS.notAuthenticated, function(event) {
    AuthService.logout();
    $state.go('outside.login');
    var alertPopup = $ionicPopup.alert({
      title: 'Session Lost!',
      template: 'Sorry, You have to login again.'
    });
  });
});
Define connection (auth.constant.js)
This is a very important part of our app. It defines the API route for use by our app. Without it, we will not be able to talk to our server!
angular.module('starter')

.constant('AUTH_EVENTS', {
    notAuthenticated: 'auth-not-authenticated'
})

//Define the API request/end point
.constant('API_ENDPOINT', {
    url: 'http://127.0.0.1:8100/app_api'
        //  For a simulator use: url: 'http://127.0.0.1:8080/api'
});
Authorisation Service (AuthService.service.js)
Arguably the most important part of our app, AuthService.service.js is the gateway provider for our API, processes server responses and handles user interactions. Make sure you take a look at this script in detail and understand all of its operations.
angular.module('starter')

.service('AuthService', function($q, $http, API_ENDPOINT) {
  var LOCAL_TOKEN_KEY = 'yourTokenKey'; //Define a local key
  var isAuthenticated = false;
  var authToken;

  function loadUserCredentials() {
    var token = window.localStorage.getItem(LOCAL_TOKEN_KEY);
    if (token) {
      useCredentials(token);
    }
  }

  function storeUserCredentials(token) {
    window.localStorage.setItem(LOCAL_TOKEN_KEY, token);
    useCredentials(token);
  }

  function useCredentials(token) {
    isAuthenticated = true;
    authToken = token;

    // Set the token as header for your requests!
    $http.defaults.headers.common.Authorization = authToken;
  }

  function destroyUserCredentials() {
    authToken = undefined;
    isAuthenticated = false;
    $http.defaults.headers.common.Authorization = undefined;
    window.localStorage.removeItem(LOCAL_TOKEN_KEY);
  }

  var register = function(user) {
    return $q(function(resolve, reject) {
      $http.post(API_ENDPOINT.url + '/user', user).then(function(result) {
        if (result.data.success) {
          resolve(result.data.msg);
        } else {
          reject(result.data.msg);
        }
      });
    });
  };

  var verify = function(user) {
    return $q(function(resolve, reject) {
      $http.post(API_ENDPOINT.url + '/user/' + user.sms_id + '/verify', user).then(function(result) {
        if (result.data.success) {
          resolve(result.data.msg);
        } else {
          reject(result.data.msg);
        }
      });
    });
  };

  var login = function(user) {
    return $q(function(resolve, reject) {
      $http.post(API_ENDPOINT.url + '/authenticate', user).then(function(result) {
        if (result.data.success) {
          storeUserCredentials(result.data.token);
          resolve(result.data.msg);
        } else {
          reject(result.data.msg);
        }
      });
    });
  };

  var logout = function() {
    destroyUserCredentials();
  };

  loadUserCredentials();

  return {
    login: login,
    register: register,
    logout: logout,
    verify: verify,
    isAuthenticated: function() {return isAuthenticated;},
  };
})

.factory('AuthInterceptor', function ($rootScope, $q, AUTH_EVENTS) {
  return {
    responseError: function (response) {
      $rootScope.$broadcast({
        401: AUTH_EVENTS.notAuthenticated,
      }[response.status], response);
      return $q.reject(response);
    }
  };
})

.config(function ($httpProvider) {
  $httpProvider.interceptors.push('AuthInterceptor');
});
App Config (app.js)
Bringing it all together is the app.js file, which contains the config for states and commands to execute when the device (or browser) is activated.
angular.module('starter', ['ionic'])

.config(function($stateProvider, $urlRouterProvider) {

  $stateProvider
  .state('outside', {
    url: '/outside',
    abstract: true,
    templateUrl: 'js/controllers/outside.template.html'
  })
  .state('outside.login', {
    url: '/login',
    templateUrl: 'js/controllers/login/login.template.html',
    controller: 'LoginCtrl'
  })
  .state('outside.register', {
    url: '/register',
    templateUrl: 'js/controllers/register/register.template.html',
    controller: 'RegisterCtrl'
  })
  .state('dashboard', {
    url: '/dashboard',
    templateUrl: 'js/controllers/dashboard/dashboard.template.html',
    controller: 'dashboardCtrl'
  });

  $urlRouterProvider.otherwise('/outside/login');
})
//On the device running (or browser)
.run(function ($rootScope, $state, AuthService, AUTH_EVENTS) {
  $rootScope.$on('$stateChangeStart', function (event,next, nextParams, fromState) {
    if (!AuthService.isAuthenticated()) {
      console.log(next.name);
      if (next.name !== 'outside.login' && next.name !== 'outside.register') {
        event.preventDefault();
        $state.go('outside.login');
      }
    }
  });
});
Get things running
The final change we need to make is in the ionic.config.json file, which is located in the root of www. Place the following syntax:
{
  "name": "login-app",
  "app_id": "",
  "proxies": [
    {
      "path": "/app_api",
      "proxyUrl": "http://127.0.0.1:8080/app_api"
    }
  ]
}
Using the terminal, navigate to the root of your project and execute the following command
ionic serve
This will then generate your app files and render it in your web browser. Be sure to have you back-end server running in another terminal window!
Conclusion
In this post we have covered the development of the IONIC app, enabling it to communicate with our back-end API and provide an acceptable user experience.
Resources
If this is still all a little new to you, you may find these resources useful when developing with MEAN:
- Book: Getting MEAN with Mongo, Express, Angular, and Node by Simon Holmes
- Book: Write Modern Web Apps with the Mean Stack: Mongo, Express, AngularJS, and Node.js (Develop and Design) by Jeff Dickey
- Create a MEAN Page Single Page Application
If you have any questions, comments or need any aspects of the code explaining further please leave a comment below